Wednesday 24 October 2018

DT Spotlight Tutorial - Christina


 Hi everyone, I'm Christina, here today in the Design Team Spotlight to share an elegant and unique wedding card that I created for a friend of mine. The colours of light blue and royal red, related to their heritages/ancestors, makes this card extra special.  


So let's get started...
Using Tim Holtz mixed media card stock as a base, I ran the TH Sizzix texture fades in sparkle on the top half of the card stock. Then applied distress oxide in Tumbled Glass over the top and lightly sanded it. 


To give it more definition, I randomly applied distress oxide in Broken China over the whole card (I didn't spritz the card with water because I wanted to achieve a chalk like finish)


Next, I created three backgrounds using distress inks in Broken China, Peacock feathers and distress oxide in Candied Apple.


I used Tim Holtz thinlits die in Funky Florals to 
create the flowers.


Now the fun part begins... WARNING.. be prepared to get inky!
I added Tim Holtz distress ink in Candied Apple and H20 spritzer to the TH crinkle ribbon, 'till the desired colour is reached. Then using my hand and a heat tool, I scrunched the ribbon 
until it was dry.


Next, I adhered the ribbon to the card and created a little 'bling'- by using pearls on the centres of some of the sparkles.


Last, but not least, I assembled the flowers then adhered them to the bottom half of the card..


I hope you enjoyed my tutorial and it leaves you feeling inspired! Please visit my blog for more photos.

Hugs, Christina.


Tuesday 16 October 2018

Current winners September 2018


Hi everyone! today we announce our top picks from the September challenge. We had some fantastic entries, thank you to all of you who took the time to join in with the fun.


Having taken the time to look at the entries, the Design Team chose Angela Hoynes from Crafting with Jack who shared this beautiful design. We loved the fabulous background technique and the spooky quote. Congratulations Angela on winning the chance to be our 
 Guest Designer. Please email Zowie at craftsdreamy1@gmail.com for more details.


Please also copy your winners badge to display on your blog and social media.


The crafts Dreamy top pick and winner of our £15 gift voucher is...


Please email Zowie at craftsdreamy1@gmail.com to claim 
your gift voucher.

Please also copy this badge to display on your blog and/or social media.


 And now for the winners of our Crafts Dreamy Top 3 Designers


The DT chose:

Anne 

Mi Bitacora artesanal


Hema 


Please copy your Top three designer badge to display on your blog and/or social media.


A big thank you from the Crafts Dreamy team to everyone who took part in this challenge and congratulations to all our winners. The current challenge for OCTOBER  runs from October 15th until November 12th. We hope to see you entering this time around so that you too can be in with a chance to win.


Happy crafting everyone!

Guest Designer - Karen

Today we introduce our Guest Designer for the October Challenge
please say hello to Karen from Karen's Crafting Obsessions
who won the challenge back in August.


"I have always been creative, drawing and knitting then sewing as a child and young adult. I was taught how to knit and sew by my Mum, my Nan and my Aunts. As a child, I loved to draw a lot, but had to stop when I picked my O Level subjects. I love colour and pretty patterns and went from hoarding fabric to acquiring then hoarding pretty patterned paper. That obsession led me to card making and that in turn led me to stamping.  
I have created greeting cards for more than twenty years and I started because I couldn't find a card that I liked for my husband.  For the past four to five years I have been intrigued and then obsessed with mixed media. I particularly love to create mixed media canvases and home decor items.
I love mixed media and learning new techniques and skills with some of the same and some different products. Until this year I struggled with acrylic paints because I've used inks and watercolours for so long. I find acrylic paints difficult, but learning and improving my skills is something I am compelled to do, it is like it is part of my DNA!"


"I was inspired by the photograph of the family, the pumpkins and the cobweb on the tree branches and that inspired me to create a spooky Halloween canvas. I used a mix of stamps with acrylic paints and Tim Holtz Idea-Ology to finish my canvas. I experimented by stamping with acrylic paints, something I have not done before, but I felt it was the best way to get the look I was after. Full details with my step by steps are on my blog."


Please do check out Karen's lovely altered canvas, we'd love for you to come back and share your project for the October challenge.

The challenge can be found HERE and is open until 11:55pm GMT on November 12th.

Monday 15 October 2018

DT Spotlight Tutorial - Zahraa


Hello Zahraa here with a tutorial on how to make a vintage card. 
Fabric designs and colours have been a huge inspiration to me lately. For this card I wanted to mimic a piece of embossed vintage velvet that I had seen. How fun to translate designs into 
something real for me as a paper crafter. 


Step one:


Paint a piece of recycled card stock with a thin layer of Gesso and talc powder. Try and paint in two directions to create texture.


Step two:


Use three colours of distress oxide and black acrylic paint and paint over the 'gessoed' piece. Notice how the gesso texture really comes alive when you add colour to it. I started with touches of black paint first, then added distress oxides in selected areas.


Step three:


Leave the ink to dry and then emboss a pattern onto the card stock piece using an embossing folder and your machine. The pattern doesn't look like much until the next step. 


Step four:


Use your black ink pad and lightly swipe the ink pad across the embossed area. The ink highlights the embossed area beautifully. While the ink is still wet, apply clear embossing powder and heat set the powder. The heat embossing leaves the embossed panel
 with a gorgeous shine. 


Step five:


Use metallic pigment ink and apply with a jumbo dauber to add some more interest and character to it. The ink sticks to some areas where the embossing didn't take and adds a beautiful shimmer on top of the heat embossing. 


Step six:


Finally, trim the panel and create a beautiful card that looks rich and luxurious just like a piece of fabric. Combining your products together leaves room for creating magic in layers.


Hope you enjoyed this tutorial! you can find more photos on my blog thanks for stopping by,

Hugs, Zahraa 


October Challenge 2018


Hello everyone, Zowie here to introduce the current Crafts Dreamy challenge, here is the Mood board for October 


The theme is anything goes; you can make a card, tag, ATC, scrapbook layout, pocket letter mixed media, collage piece etc the possibilities are endless! 


 The winner of the challenge will have the chance to
be featured as a Guest Designer at Crafts Dreamy and everyone who enters the challenge will go into the draw to win a Fifteen pound gift voucher (provided by myself) to spend at Crafteezee The Design Team will also choose a further three favourite designs. Please click on the link below for more details on how to enter; the Design Team and I look forward to you sharing your creations with us! 

Rules are simple, create a project, the theme is anything goes, enter by clicking on the link HERE include a link back to this challenge in your blog post. You can combine our challenge with up to 5 challenges (including this one) If you are entering through Instagram, Facebook, Flickr, you'll need to include #craftsdreamychallenge


I would like to thank the super talented Design Team for their stunning creations, please click on the persons name to see how they created them and to leave these wonderful ladies some comment love!


So now it's your turn to join in with the fun! we look forward to seeing your creations! you can enter them HERE The challenge closes on the 12th November at 11pm BST


Follow us on Facebook to join our group and to share your creations with us 


Do you use Instagram? please use the 
craftsdreamychallenge 
so that we can see your creations there too. 

Thanks for stopping by,

hugs from the Crafts Dreamy team xx 

Sunday 14 October 2018

DT Spotlight Tutorial - Zowie


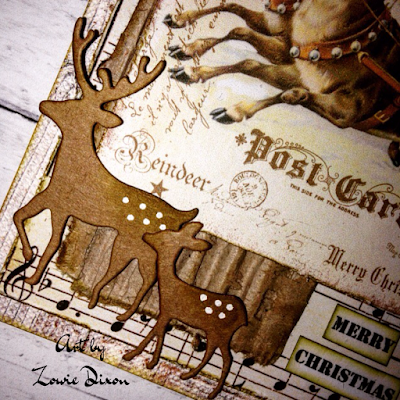
Hello, Zowie here with a quick tutorial on how to create a vintage nostalgic Christmas Postcard. 


To start, I chose these beautiful papers to adhere to a tag that I made from plain white card stock measured at 5.5" x 3.5"

* Wood design- Wild at heart paper stash

* Digital music sheet- LaBoutiqueDeiColori

* Vintage Reindeer image- GraphicMarketplace


Next, I used a North Star and two Reindeer metal dies along with Kraft card stock. I distressed the edges with Vintage Photo Distress ink and created some small white decoration on the Reindeer's body. I have also embossed the star with a embossing folder. 

Medium Reindeer - Xcut mini die 

Small Reindeer - Marianne Design Christmas village decoration set 

Star die - Xcut mini die  

Snowflake embossing folder - Crafters Companion Vintage collection


Finally I printed out the words 'Merry Christmas' on to white cardstock and inked the edges with Vintage Photo Distress Ink. 


Hope that you've enjoyed this tutorial! You can find more photos on my blog Crafts from the Fairy Den


Happy Crafting!